

Your Nagging Lower Pain Explained!
Here at Waldwick Family Chiropractic, we treat many patients suffering from lower back pain. I see this a lot in my police officers who carry a gun on the right side or patients who just tend to favor one side, Maybe you tend to hike one hip more than the other? I'm going to show you a quick test you could do at home to see if this video applies to you.
As we launch our new business in the Florida Keys, I've decided to repurpose some of the content from our old website in New Jersey. While the topics may not be specific to the Keys, I hope you'll find the information helpful and informative.
Here at Island Sports Chiropractic & Joint Center, we treat many patients suffering from lower back pain. I see this a lot in my police officers who carry a gun on the right side or patients who just tend to favor one side, maybe you tend to hike one hip more than the other? I'm going to show you a quick test you could do at home to see if this video applies to you.
We're going to be assessing, what's called the gluteus medius muscle. A lot of you have heard of the gluteus maximus, that's the most popular, right? This is actually the gluteus medius, and it's a big player in low back pain. So a quick at-home test you can do is just stand on one leg, hands on your hips- make sure you don't fall. And if you tend to sag away from the side that you're standing on, as you do that, that could be a sign of gluteus medius weakness. And that can cause low back pain and things like the SSI joint, the sacred iliac joint, or all the way up into the lumbar spine. I'm going to show you a quick at-home exercise that you can do if you've noticed that you tend to sag away from the leg that you're standing on.
We've established that gluteus medius weakness is you by that standing test on one leg. Now we're going to show you a variation of the old clamshell exercise. This used to be a way that we thought would strengthen the gluteus medius, but this is actually a little bit better of an approach for that muscle. We're going to keep this bottom leg nice and bent for a nice stable support system. This way you're not rocking back and forth. And we're going to lift the leg parallel with the ground. Now that's going to be our starting point. So, when we do the exercise, we're going to return to this point. We're not going to return to the floor. We're going to return right to this point.
To attack that gluteus medius muscle, we're actually going to rotate our foot out just a little bit. When you do this, I want to make sure you're not doing this. You're not opening your hips up. Your hips are staying straight, stacked on top of each other and just a slight rotation of the foot and the hip, rotating that outwards. Once you get there, you're just going to elevate the foot about 30 degrees and return it to that parallel position. Again, we're not returning to the floor, just to that parallel position.
You should feel a contraction right above your back pocket if you're doing this correctly. It's a nice exercise but it’s going to be very difficult if you have gluteus medius weakness. So, that might be tough. Start with maybe three sets of 10 at home, work your way up to three sets of 15 and go from there.
If you have any questions or please do not hesitate to reach out!

Jesse J. Suess, DC CCSP®
Seaside Chiropractic
Key Largo, FL

Is Your Hip Mobility Impacting Your Golf Swing?
Here at Waldwick Family Chiropractic, we treat a lot of golfers for hip and back-related pain. Here's a quick screen you could do right at home or on the athletic field, the golf course for my swing athletes, golf, and baseball, to determine if your hip rotation is lacking and may be impacting, not only causing you pain in your hip or your low back but also impacting your athletic performance.
As we launch our new business in the Florida Keys, I've decided to repurpose some of the content from our old website in New Jersey. While the topics may not be specific to the Keys, I hope you'll find the information helpful and informative.
Here at Island Sports Chiropractic & Joint Center, we treat a lot of golfers for hip and back-related pain. Here's a quick screen you could do right at home or on the athletic field, the golf course for my swing athletes, golf, and baseball, to determine if your hip rotation is lacking and may be impacting, not only causing you pain in your hip or your low back but also impacting your athletic performance. So, you're going to take your tool, in my case, it's a golf club. You could use a baseball bat too if that's what you have.
The first thing you're going to do is you're going to take a measurement of one-foot length from the inside of your other foot. You're going to place the golf club right there and then the other foot right on the outside of that. Then I'm going to lay the golf club down right in the center of my two feet. And I'm going to brace my hips just like this.
So as I'm bracing my hips, I'm not going to allow my body to turn with my foot. I'm going to keep my hands right nice and steady. And I'm going to lift my toes off the ground, heels on the ground. I should be able to touch the inside of that golf club with my toes. If I can't do that, and that's important, is that means I'm lacking internal rotation of the right hip. And if you think about why that's important, especially with a golf swing or a baseball swing, especially if it's your back hip, you need a good amount of internal rotation to kind of drive that swing forward and generate power through that swing.
So again, if you're lacking internal rotation with that test in your back, your plant foot, so your back foot. If you're a righty in golf or baseball, it will be your right leg. If you're a lefty, it will be your left leg, if you're lacking internal rotation, that can not only cause you pain, things like low back pain for compensation, but it can also cause a decrease in your performance or decrease in your ability to generate power through that.

Jesse J. Suess, DC CCSP®
Seaside Chiropractic
Key Largo, FL

Is Your Weak Core Causing Your Low Back Pain?
At Waldwick Family Chiropractic one of the most common concerns that we see from our patients who suffer back pain is their core stability. Many people think they have a weak core, or that their core is not doing the job that it is supposed to do. Today we are going to discuss one of the preliminary findings that we look for when a patient has this type of concern. The best part is that this is easy enough that you can do it right at home, and the fix is even easier!
As we launch our new business in the Florida Keys, I've decided to repurpose some of the content from our old website in New Jersey. While the topics may not be specific to the Keys, I hope you'll find the information helpful and informative.
At Island Sports Chiropractic & Joint Center one of the most common concerns that we see from our patients who suffer back pain is their core stability. Many people think they have a weak core, or that their core is not doing the job that it is supposed to do. Today we are going to discuss one of the preliminary findings that we look for when a patient has this type of concern. The best part is that this is easy enough that you can do it right at home, and the fix is even easier!
While laying on your back, you are going to put your left hand on your chest and your right hand on your belly button. Once in this position, you are going to want to take a couple of big deep breaths.
The breath is super important when it comes to core stability because the brain locates the core and turns the core on, based on a pressure gradient in the abdomen, known as intra-abdominal pressure.
If you've never achieved the proper pressure within your abdomen, the brain is unable to locate the core. Many times when we're not achieving that proper pressure gradient, the brain will actually bypass the core as a whole and start to utilize the hips to stabilize the spine. This is a problem because the hips are designed to be mobile, not stable.
While breathing in the position you are looking to see which hand raises first with each breath. Ideally we want to see the bottom fill up like a balloon and then the chest to raise last. We should fill the tank from the bottom up, not from the top down.
If you notice your top hand is moving first that's problematic to me because it's telling us that the breath is not being led with the diaphragm. When this happens, I coach patients to stabilize their top hand. It's very difficult to do, but try not to breathe in with your top hand at all. I want you to breathe in and fill your stomach up like a balloon as you breathe in.
If this is something you are not used to doing it will probably feel a little weird, maybe even like you're breathing backward. If you notice how much slower and foreign that seems, it’s because that's a neurologic motor pattern, similar to when you learned to write as a kid. If you're right-handed, you just pick up your pen and start writing without thinking about it. Right now, you are essentially trying to write with your opposite hand, that's why it feels so funky.
When it comes to core stability, I cannot stress enough how important it is to achieve proper intra-abdominal pressure.
Once a patient has achieved the ability to breathe properly, what I'll have them do next is grasp their side with their fingers. You will want to grasp right above your hips. You do not want to squeeze too hard, just a nice firm grab so that you can feel your fingers in your abdomen.
At this point, I will coach a patient to "Breathe into your fingers." I want to see their fingers expand equally from the front and back with each breath.
You will want to do this a couple of times and you really want to fill that balloon up. I always tell my patients, "This is the easiest exercise I'll ever give you. Lay on your back and breathe."
Not to mention, you will also get some built-in meditation because meditation is focusing on your breathing. This is really an awesome exercise and an easy way to help with your core stability. It can also help with anxiety because you're getting that meditation component.
If you're worried about your core stability, this is a great place to start. If you're still experiencing a lot of pain, I definitely recommend you head into Waldwick Family Chiropractic so we can do a bit more of an in-depth examination.

Jesse J. Suess, DC CCSP®
Seaside Chirorpactic
Key Largo, FL

How to Upgrade Your Laptop Workstation for ONLY $60!
A few weeks ago, we looked at why you may be experiencing more headaches since you started working from home. Now that you understand why it leads to pain, let's dive into how you can optimize your laptop workstation to prevent these types of nagging injuries from occurring in the first place.
As we launch our new business in the Florida Keys, I've decided to repurpose some of the content from our old website in New Jersey. While the topics may not be specific to the Keys, I hope you'll find the information helpful and informative.
Laptop Stand ($25) + Wireless Keyboard & Mouse Combo ($35) = $60!!
**CHEAPER THAN A CHIROPRACTIC RE-EXAMINATION VISIT!**
TAG US IN YOUR INSTAGRAM STORY (@WaldwickChiropractic) TO SHOW OFF YOUR NEW & IMPROVED LAPTOP WORKSTATION!
A few weeks ago, we looked at why you may be experiencing more headaches since you started working from home. Now that you understand why it leads to pain, let's dive into how you can optimize your laptop workstation to prevent these types of nagging injuries from occurring in the first place.
If you're working at your kitchen table on a laptop or lounging back on your couch, your head is in a tucked chin posture, which is not good for the neck. I would recommend investing in a laptop stand. The one I have was about $25 on Amazon (LINK HERE). A laptop stand lets you adjust the laptop so that your laptop screen can sit at eye level. This is the recommended position that will allow for proper neck ergonomics.
If you're doing primarily Zoom calls, this laptop stand is probably enough for you. However, if you're doing a lot of typing, Excel sheets, etc. I would recommend spending another $35 on a wireless keyboard and mouse (LINK HERE). This will add support and comfort, especially for your wrist.
Lastly, if you're lacking an ergonomic chair with proper lumbar support and you are stuck sitting on a kitchen chair and you don't have a proper ergonomic chair, I would recommend grabbing a pillow off your couch and placing it at the base of your low back. This pillow is not necessarily for support, but just a reminder to let you know when you're slouching. You want to be sitting up nice and straight. If you're having trouble doing that, a little bit of a couch pillow support/reminder should be good enough!
If you have any questions or please do not hesitate to reach out!
DrJesse@WaldwickChiropractic.com

Jesse J. Suess, DC CCSP®
Seaside Chiropractic
Key Largo, FL

Chiropractic During Pregnancy
Odds are that you’ve heard somebody suggest seeing a Chiropractor during pregnancy. I’m also willing to bet that you’ve never got a straight answer to where Chiropractic care fits in the process. I’m here today to educate you on why Chiropractic care should be deemed essential to every pregnancy, not only to alleviate Mom of any back pain that may arise but more importantly to prepare Mom’s body for the birthing process!
As we launch our new business in the Florida Keys, I've decided to repurpose some of the content from our old website in New Jersey. While the topics may not be specific to the Keys, I hope you'll find the information helpful and informative.

Should you be seeing a Chiropractor while you’re pregnant?
Whether you’re a mom, a mom-to-be, or somebody who is essential in the birthing process such as an OBGYN, a nurse, or a doula; odds are that you’ve heard somebody suggest seeing a Chiropractor during pregnancy. I’m also willing to bet that you’ve never got a straight answer to where Chiropractic care fits in the process. I’m here today to educate you on why Chiropractic care should be deemed essential to every pregnancy, not only to alleviate Mom of any back pain that may arise but more importantly to prepare Mom’s body for the birthing process!
During the birthing process, your body emits a hormone called “relaxin”, this hormone allows the joints of your pelvis (primarily the SI Joints and Pubic Symphysis) to expand an additional 6-8mm in order to make room for the baby to make it through the birthing canal safely. If there are any underlying fixations in these joints of the pelvis that exist from everyday life (sitting too long, crossing your legs, etc.) it will just make the pelvic expansion process more difficult when it is time to give birth. This is where chiropractic care can help!
Not addressing these everyday fixations before it’s time to give birth can lead to an increased amount of work required by the body to get the baby through the birthing canal, ultimately leading to a longer “push time”. Although there is no hard research to back this, a vast majority of the patients that we’ve cared for here at Suess Family Chiropractic through pregnancy have reported a “push-time” of less than one hour. It’s my belief that this is because they were willing to put in the work to remove those pelvis fixations prior to the big day!
This is why we recommend that our expecting mothers present for maintenance visits during their pregnancy. As for the frequency of care during pregnancy, we recommend that mom schedule her maintenance visits during the same week as her OBGYN appointments. So early in her pregnancy, she will present once per month, and as pregnancy progress, we increase the frequency of care.
So what does Chiropractic care look like during pregnancy? More importantly, is it even safe to see a chiropractor when you’re pregnant? Below we take you through what Chiropractic care looks like in each trimester!
Note: Although we recommend that you begin seeing a Chiropractor in your first trimester, some patients don’t present until the 2nd or 3rd trimester for their first treatment and still reap the benefits. It’s better late than never!
Trimester 1
Recommended Frequency: 1x/month
Trimester one is a tricky trimester for most Moms. Not only is mom going through physiological changes that can lead to symptoms like nausea and hormonal changes, but she’s also oftentimes going through social changes as well. No caffeine, no alcohol, wondering when it’s safe to announce to the world that she’s pregnant. Pregnancy itself is already a stressful process, now add these social stressors to the mix and it can really have an effect on Mom.
So how can someone like a Chiropractor, whose job is to treat the musculoskeletal system help with stress? Check out this publication by the APA (American Psychological Association) published the following:
“With sudden onset stress, the muscles tense up all at once, and then release their tension when the stress passes. Chronic stress causes the muscles in the body to be in a more or less constant state of guardedness. When muscles are taut and tense for long periods of time, this may trigger other reactions of the body and even promote stress-related disorders. For example, both tension-type headache and migraine headaches are associated with chronic muscle tension in the area of the shoulders, neck, and head. Musculoskeletal pain in the low back and upper extremities has also been linked to stress, especially job stress.”
Shaw, Williams. “Stress Effects on the Body: Musculoskeletal System.” American Psychological Association, American Psychological Association, Nov. 2018, www.apa.org/helpcenter/stress/effects-musculoskeletal.
Trimester 2
Recommended Frequency: 2x/month
Enter low back pain! Why does this happen? Look at it this way, of course, you’re aware that you’re pregnant, your family and friends are aware that you’re pregnant, and by now your social media following is probably aware that you’re pregnant too. The only thing that doesn’t know your pregnant at this point is the part of your brain that is responsible for your biomechanics.
When we see a rapid shift in weight distribution it throws the body’s balance system out of whack. As your stomach starts to grow forward, your center of gravity begins to shift forward as well. This confuses the body’s balance system and the body reacts by squeezing the muscles in the low back in an attempt to bring the body back to the center of gravity. This tightening of the low back musculature can cause conditions like low back pain, hip pain, sciatica, to name a few.
Trimester 3
Recommended Frequency: 1x/week until Child Birth
Alright, we’ve made it this far! It’s almost game day for you and your family. The excitement to meet your little one is mixed with the anxiety of the birthing process. But I’ve got good news for you! All the work that we’ve been doing to keep you out of pain in the first two trimesters has also secretly been getting your body ready for birth.
Remember that hormone “relaxin” that we mentioned earlier? It has been working tirelessly to relax the joints of your pelvis for the last few months. The magic word here is persistence. With the big day right around the corner, we would hate for something silly like a long car ride or too much time on the couch reverse all the work we’ve done to loosen your pelvis during the first two trimesters.
Trimester 4
Recommended to follow-up at 6-weeks postpartum, or when receiving full clearance from OBGYN.
Surprise! I bet you didn’t know there was a fourth trimester. I probably don’t have to tell you this, but childbirth is considered a traumatic event to your body. You did such a great job of following all of our pregnancy recommendations to make sure that your baby arrives healthy and happy, but now the focus shifts on to Mom to make sure that she can make an easy and full recovery.
Remember the conversation that we had about rapid shifts in your center of gravity earlier? Well, the same thing happens after giving birth, only this time your gravity shifts backward. Mix that with the “hardening” of your ligaments and joints as the relaxin leaves your body, and it could lead to pain and occasionally more chronic conditions.

Jesse J. Suess, DC CCSP®
Seaside Chiropractic
Key Largo, FL

Understanding Shin Splints
Anybody who has had the displeasure of dealing with shin splints understands how frustrating and mysterious this condition can seem. But in actuality, understanding the origin of this injury can help you alleviate and even prevent these injuries from occurring in the first place.
As we launch our new business in the Florida Keys, I've decided to repurpose some of the content from our old website in New Jersey. While the topics may not be specific to the Keys, I hope you'll find the information helpful and informative.

Understanding Shin Splints by Dr. Jesse Suess
You lace up your shoes for a nice morning jog to clear your mind. You turn the corner, hit the main drag, pick up your pace and there it is again! It’s like somebody is stabbing you in the front of your leg like with an ice pick. As a runner, you’re at an increased risk of developing these types of repetitive stress type of injuries like shin splints. Anybody who has had the displeasure of dealing with shin splints understands how frustrating and mysterious this condition can seem. But in actuality, understanding the origin of this injury can help you alleviate and even prevent these injuries from occurring in the first place.
As a licensed chiropractor who's focus is on biomechanics and mobility these types of repetitive stress type injuries are something that we deal with on a daily basis. These repetitive stress type injuries all have one thing in common, and that one thing is imbalances in the biomechanics. Whether you’re a high school track athlete, a marathon runner, a weekend warrior, or somebody who relies on running as a source of stress relief the last thing that you want to be prescribed is long periods of rest.
My goal for this article is to first educate you on exactly what shin splints are, how to treat them at home, how to recognize when to seek help from a medical professional, and most importantly how to prevent them from occurring in the first place. After all, if shin splints are left untreated they can lead to more serious conditions such as stress fractures or compartment syndrome.
Understanding Shin Splints
The Anatomy and Biomechanics of a Shin Splint
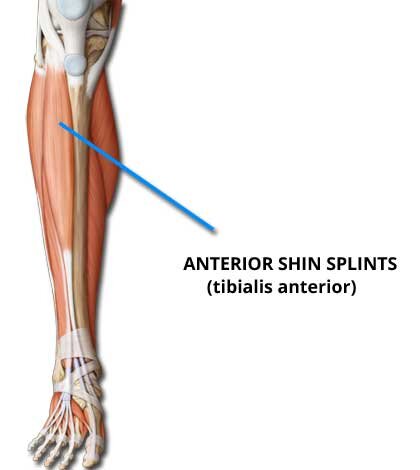
Shin Splints (Anatomy)
Anatomically, shin splints occur due to the proximity of muscle to bone in the front of the lower leg. In this picture you can see the tibia (shin bone) and a muscle called anterior tibialis, the job of this muscle is dorsiflexion of the foot (pulling your toes up towards your knees). The pain occurs when there is inflammation of this muscle and the tendons/connective tissue that attaches this muscle to the shin bone (tibia). Long-standing muscular imbalances mixed with repetitive stress, such as running, is the perfect concoction to create chronic inflammation.
Biomechanically, every major muscle has something called an antagonist. The job of this muscle is to stabilize the opposite structures of the body while the primary muscle is doing its job. In this example, the calf muscle is the antagonist of the anterior tibialis muscle. So when the anterior tibialis is firing to pull your toes toward the sky right before your heel hits the ground in your stride, the calf on the back of the leg is also contracting to provide stability within the leg. Wait it gets even more confusing, it also works in reverse! So when your calf, who’s job is plantar flexion (pointing your toes down towards the ground) is firing during toe-off in your stride; the anterior tibialis is being that antagonist of the calf muscle providing a stable base for the motion to occur.
I hope your head isn’t spinning too much, and unless you have a minor degree in kinesiology that probably sounded like pig-Latin. But that’s okay! The main take-home point here is that the calf and the anterior tibialis (aka the muscle responsible for shin splints) work together to balance the biomechanics in the lower leg. Shin splints begin to occur when the calf muscle is significantly stronger than that of the anterior tibialis, making it very difficult for the anterior tibialis to perform its job as the antagonist. It’s like playing tug of war against a professional bodybuilder, the bodybuilder is your calf and you are the muscle responsible for shin splints. Let this imbalance occur for prolonged periods, and POOF, you’ve just created shin splints!
The Role of Ankle Pronation in Shin Splints

Shin splints (Pronation)
Pronation is when the stabilizing arches in the foot begin to collapse, causing the ankle and the tibia to rotate inwards. This causes a large amount of stress on the muscles, ligaments, and joints throughout the entire lower body. Ever wonder why over 70% of knee replacement surgeries are unilateral (one-sided), that’s because pronation does not occur symmetrically from side to side. Most often there is one foot/ankle that is more pronated than the other. Patients tend to carry more weight on the side of their body where the pronation is more progressed leaving them more prone to conditions like shin splints, ankle pain, knee pain, hip pain, and low back pain on the side that is more severely pronated. Getting your foot scanned by a medical professional who utilizes FootLevelers technology will help you determine your level of pronation and will determine if adding a custom supportive orthotic to your running shoe would be recommended.
3 At-Home Exercises to Prevent Shin Splints
Band-Resisted Ankle Dorsiflexion
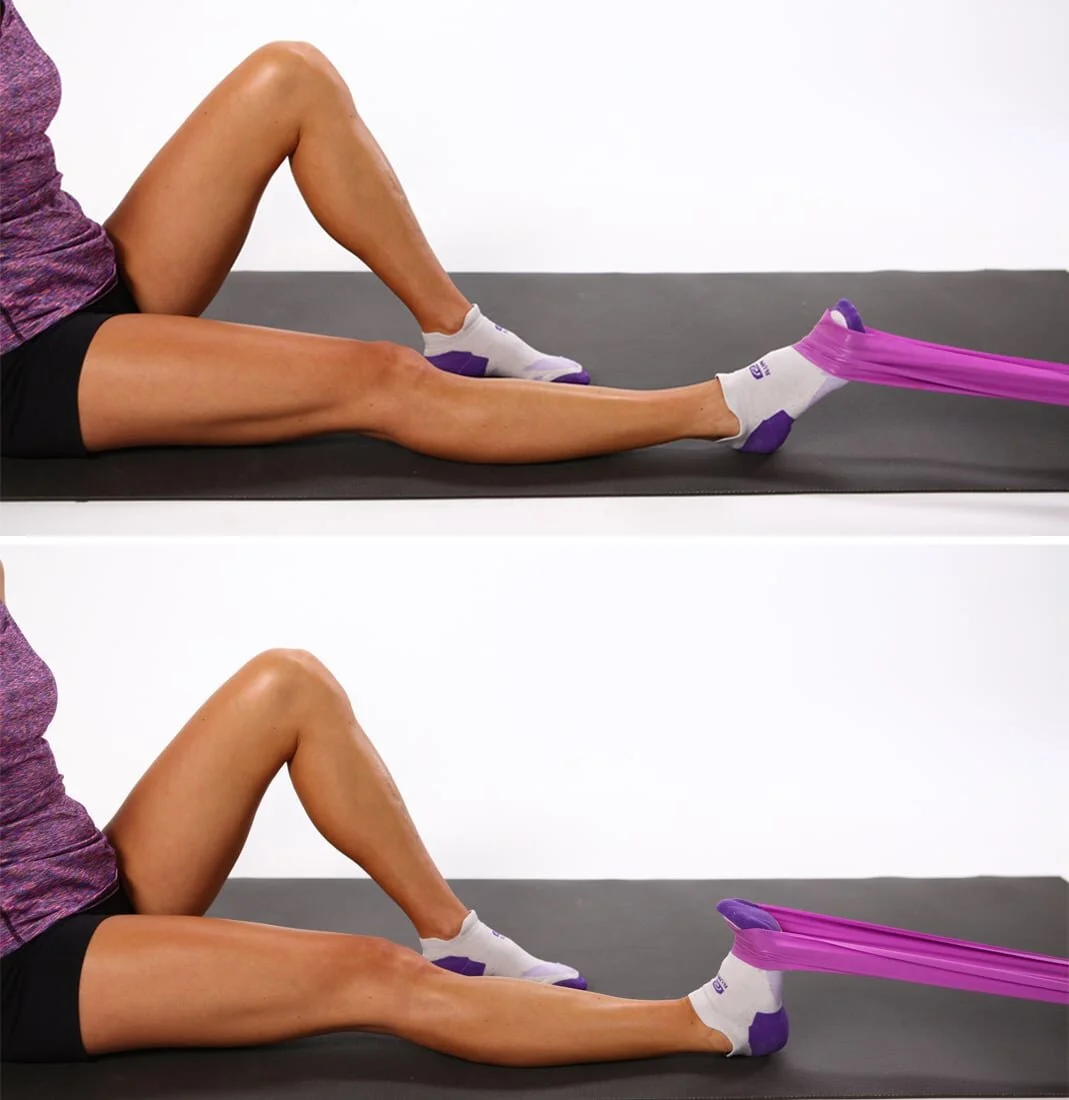
Shin Splint Stretches (Band-Resisted Ankle Dorsiflexion)
Have a seat on the floor with a straight leg, take a resistance band and wrap it to something nice and sturdy out in front of you. Place the band around the top of your foot so that the band is causing resistance, pulling your toes away from your body. Once the band is in place pull your toes towards your knee in a slow and controlled motion against the resistance of the band. This will help increase the strength of the anterior tibialis muscle and help lessen the strength discrepancy between the calf and the anterior tibialis described above. Always do these exercises bilaterally (both sides) to make sure you are not developing asymmetries.
Calf/Anterior Tibialis Stretches
I always recommend that when you’re performing any at-home type stretching work you always stretch both the muscle at hand and it’s antagonist. As with resistance band injuries, make sure to do these stretches bilaterally. If you notice one side is tighter it is okay to hold the tight side for 5-10 seconds longer than the other side. Here is a good stretch for both:

Shin Splint Stretches (Standing Anterior Tibialis Stretch)
Anterior Tibialis Stretch
Standing in an upright position about 6-12 inches from a wall for support. Place the top of the involved foot on the floor and slightly push down against the floor. You should feel a good stretch in the front of your ankle and into the front of your leg to about the knee level.

Shin Splint Stretches (Standing Calf Stretch)
Calf Stretch
Standing in an upright position place the toes of the non-involved foot up against the wall. Place the involved side behind you in a lunge position about 2 feet behind the front foot (pictured below). Drive the heel of your back foot towards the floor causing a stretch into the calf.
Foam Roll the Calves/Anterior Tibialis
Foam rolling is a great at-home way to help alleviate any underlying muscle fixation or trigger points that may form. The trouble with foam rolling is that most people do it wrong. Most people just roll the foam roller back and forth until they feel good, this is mostly palliative in nature and not clinically beneficial.
Here is the correct way to foam roll:
Get into position with the foam roller perpendicular to the involved muscle group.
Slowly roll the foam roller along the involved muscle. Eventually, you will come across an area that is more tender than the rest. This is called a trigger point.
Once you’ve identified the trigger point hold in the position so that the foam roller is holding still on that trigger point, and hold for about 30-45 seconds before proceeding the roll up the involved muscle.
Repeat this process and hold foam roller over ONLY 3 SPOTS PER MUSCLE GROUP.
Here are some great positions that we recommend you use to foam roll your calf and your anterior tibialis:

Foam Rolling Shin Splints (Anterior Tibialis)

Foam Rolling Shin Splints (Calves)
When to Seek Guidance from a Medical Professional
Shin splints might seem like more of an annoyance than a legitimate medical concern when you’re experiencing them, but the reality is that they can be a precursor to more severe conditions like a chronic bone bruise, stress fracture, and anterior compartment syndrome. If shin splints are something that you experience regularly, we strongly recommend that you seek the opinion of your local chiropractor or sports medicine doctor in your area. If the symptoms progress to a severe throbbing type with associated numbness, tingling, or paralysis; this can be evidence of a more serious condition called Anterior Compartment Syndrome. This is an emergent situation, and if you experience these types of symptoms you should present to the emergency room immediately.
It’s important to remember that pain is like the smoke alarm of your body, your body’s way of letting you know that there is a problem. We can mask the pain by taking over the counter medications, applying topical creams, or using a TENs unit but this is no different than taking the batteries out your smoke detector when your house is on fire!

Jesse J. Suess, DC CCSP®
Seaside Chiropractic
Key Largo, FL